The Ten Most Common Gasketing Mistakes:
Gasket makers and flange sealants are great time savers to have on hand in the shop. And, when compared to a traditional gasket, the material costs for gasket makers are much less. Plus, if you have gasket makers on hand, you don’t lose time waiting for a part delivery.
Gasket makers and flange sealants have tremendous reliability. They can eliminate leak paths that traditional gaskets can’t, and they’re super resistant to vibration, fluids, and temperature cycles. That said, there are a few gasket application mistakes that even experienced pros sometimes make that can compromise a repair. Steer clear of these mistakes and your gasketing work should be 100% reliable:
1. Using a gasket maker to replace a head gasket.
While today’s gasket makers and flange sealants can replace most conventional, formed, or multi-material gaskets, they should never be used to replace a head gasket. For cylinder heads, stick to the OE-style gasket.
(Fig. 1) Never replace a head gasket using a gasket maker
2. Using the wrong type of gasket maker for your application.
Gasket makers and flange sealants are specially formulated for specific applications. These formulations are available for a variety of requirements: high temperatures, resistance to synthetic oil, O2 sensor compatibility, water-glycol resistance, and more. Trying to use one gasket maker or flange sealant for every application may not result in a reliable repair. Make sure the gasket maker or flange sealant you use meet the specs for your application.
3. Applying too much gasket maker or flange sealant.
When it comes to gasketing, more is not necessarily better. Knowing the right amount to apply takes some experience, but a bead thickness of around 1/8” is a good place to start. The bead of gasket maker or flange sealant that you apply will spread out to a very thin layer when you tighten up your assembly, so you don’t need to apply a lot of product to get the ideal seal. Applying too much product can cause excess sealant to squeeze out and migrate into areas where it might cause trouble – such as clogging the screen of the oil pickup. Try to apply the gasket maker or flange sealant in one continuous and even bead to one surface. Ensure all bolt holes are circled.
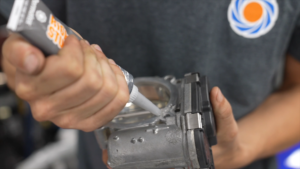 (Fig. 2) Only apply a very thin bead of gasket maker. A thin bead will spread out and cover the assembly properly. Excess gasket maker can cause it to squeeze out.
4. Using an RTV or anaerobic gasket maker on an application that is exposed to gasoline.
Only solvent-based gasket makers have the ability to stand up to repeated direct contact to gasoline. Powersports vehicles, antique cars, gas-powered tools, and equipment all tend to have their gaskets exposed to gasoline. Gas weakens RTV and anaerobic flange sealants. If your assembly will have direct exposure to gasoline, you should use a solvent-based gasket maker.
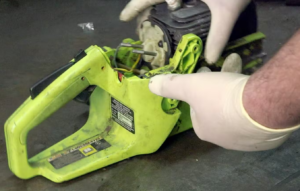 (Fig. 3) Never use an RTV gasket maker on an application that will be exposed to gasoline, such as a powersports vehicle.
5. Not allowing the full cure time before returning to service.
All gasket makers and flange sealants need some time to cure before the assembly can be put back into service. Failure to wait the correct amount of time can compromise the integrity of your seal. Typically, RTVs require a minimum of two hours to set up and 24-hours to achieve the full cure that’s needed before adding fluids or returning the vehicle to service.
Anaerobic flange sealants and gasket makers need about an hour to cure. Solvent-based flange sealants need to air-dry before they can be reassembled, and then they need another 10 minutes to dry before re-checking torque.
However there is one elastomeric RTV gasket maker that can be put back into service immediately, and that’s Permatex The Right Stuff®. This formula allows you to simply ‘torque and go.’
6. Trying to fill a large gap with an anaerobic gasket maker.
Anaerobic gasket makers and flange sealants are designed for sealing assemblies where two close fitting machined metal surfaces come together. They’re generally recommended for gaps of up to 15 to 20 thousandths of an inch only. If you’ve got larger gaps – such as sealing a stamped steel oil pan, you should be using an RTV gasket maker.
(Fig. 4) Only fill large gaps, larger than 20 thousandths of an inch, with an RTV gasket maker.
7. Waiting for the gasket maker to partially dry before reassembling.
Many mechanics like to wait for the gasket material to ‘skin over’ before reassembling. But in most cases, gasket makers work best when assembled immediately, while the material is still wet (solvent-based gasket makers / sealants are an exception to this rule). Anaerobic gasket makers and sealants simply won’t begin to cure until you put the assembly together – anaerobic means that the sealant cures in the absence of air and the presence of active metal.
8. Incomplete surface prep.
To have a successful formed-in-place gasket, you need to prep both surfaces so that you’re working with clean, bare metal. Failure to clean of old gasket or gasket maker materials may result in the mating surfaces coming together in an uneven alignment. This can compromise the seal and the operation of the assembly. Never scrape off old gaskets with a razor blade or anything that can scratch the metal surfaces and create a leak path. Use a plastic scraper or nylon brush. You may want to also use a chemical gasket remover.
9. Incorrect reassembly.
A common gasketing error occurs when the reassembly process is rushed. Many mechanics believe that 4 hours of cure time is sufficient to return a vehicle back to service when using silicone gasketing products. There are gasketing formulas that allow an immediate return to service, such as Permatex The Right Stuff®. However, most gasketing products require 24 hours of cure time.
When using RTV gasketing, proper reassembly requires the following:
- Apply a continuous bead of silicone to the mating surface.
- Assemble parts with bolts finger tight ensuring contact is established while the silicone is still wet.
- Let set for 1 hour, then torque all fasteners to proper values dictated by the vehicle service manual.
- After 24 hours of cure time, fill all necessary fluids and return the vehicle to service.
These proper steps will ensure a quality seal has been established.
10. Using a gasket maker as a dressing on a conventional gasket.
This might be the most common gasketing error of all. Many mechanics will use an RTV gasket maker to hold a conventional or cut gasket in place during assembly. Some mechanics will even use the RTV gasket maker as a dressing, coating both sides of the gasket. Gasket makers are the wrong product for these applications – their formulations are too thick for use as a dressing. If you’re installing a conventional gasket, use a gasket sealant – they’re available in sprays, liquids, and tubes, with specialized formulas for a variety of applications.
If you’re a full-time auto repair pro or dedicated DIYer, gasket makers and flange sealants are products you’ll want to keep on hand to save time and money. Keep clear of these common errors and your assemblies (and your customers) will thank you.